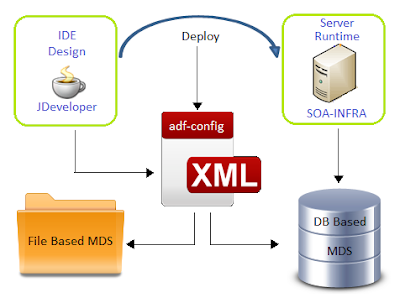
Meta Data Store:
The MDS is basically an XML store
with transaction capabilities, versioning, merging and a persistence framework
optimized to work with XML nodes and attributes. The persistence framework has two adapters
that can persist the store to a database or to a folder on disk. The database
store has more advanced features is the recommended way of working with MDS.
The file store is useful for at development time, because one can change the
files manually.
SOA 11g and 12c provides us with MDS
repository (both file based & DB based) where common artifacts can be
stored and referenced by all projects in the SOA infrastructure.
File and DB Based MDS:
File based MDS is used during design/deploy time whereas DB based MDS is used
at run-time by the SOA infra. A configuration file named adf-config.xml that is
part of every SOA project manages this partition mapping to be used by
JDeveloper during design/deploy time.
File Based MDS:
The idea
behind file-based repositories is to allow developers to have a light
repository available in their local environment that can be easily adapted for
development and tests; a file-based repository relieves developers of having to
configure and maintain an external database while providing necessary
functionality, such as file referencing and customizations. These kinds of
repositories are easily modified and maintained, since they define a directory
structure similar to any other directory structure inside an operating system.
They can be navigated and altered using common shell commands or any kind of
visual file explorer application. The file-based repository is usually located
inside the Oracle JDeveloper home (JDEV_HOME/integration) if the default
configuration is used.
MDS is created under <JDEV_HOME>/integration/seed directory.
Default folder “soa” is used to store common system soa artifacts. All custom
artifacts are supposed to be stored under a folder called “apps”, since this
folder already exists in server.
Create directory structure under apps folder. In
my case, I’ve created folder structure <JDEV_HOME>/integration/seed/apps/<myproject>/common/xsd to
store XML schema files. This ideally should match your schema structure.
·
First you go to your local 12c Jdeveloper
installation folder. In my case it is C:\1221\Oracle\Middleware\Oracle_Home\jdeveloper\integration\seed
folder .You can see seed folder, If not create a
seed folder.
·
Now create folder with name apps under seed.
·
Under apps you can create your folder structure to place all
your XSD, WSDL files like apps/xsd/<*.xsd> etc.
·
Create MDS connection in Jdeveloper as below
I. We can find Resource palette
pane on left side of the Jdeveloper
II. Click on New SOA-MDS Connection
for creation of new SOA-MDS connection like below
In Create SOA-MDS
Connection window, select File
Based MDS as Connection Type for file based
MDS connection. We will point to the local folder in our system where all the
WSDL and XSD files are placed as shown below. So when we use the wsdl and xsd
files in the project, they will be referred from the local system. Click on
Test Connection, It will show the status as ‘Success’.
Click OK. Now the File Based MDS connection
is created. Now we can see the MDS connection tree structure on left pane under
SOA-MDS.
Once the artifacts that needs to be
shared/referenced are placed under the appropriate namespace (in this case
'apps'), we can let the SOA project in JDeveloper to point to MDS for these
artifacts from a common location.
adf-config.xml configuration:
As noted earlier, adf-config.xml is an important
configuration file which holds the details regarding the MDS (both file based
& DB based). By default, this file declares the 'seed' partition & the
metadata store for 'soa' namespace.
This file can be found under
<YourApplication>\.adf\META-INF.
Alternatively, in JDeveloper, expand the
'Application Resources' panel; drill through Descriptors -> ADF META-INF to
find this file
Step 1: Just add the metadata store namespace
for '/apps' in additions to default '/soa/shared' namespace - This is to let
the JDeveloper reference the artifacts under the '/apps' during the design time
from the file system metadata store.
Adf-config.xml:
Step 2: In the SOA composite.xml, reference the
common artifacts from MDS as shown below;
<import namespace="http://xmlns.oracle.com/bpmn/bpmnProcess/CommenErrorHandlerProcess"
location="oramds:/apps/Tesco/common/CommenErrorHandlerProcess.wsdl"
importType="wsdl"/>
There are two methods available for
us to deploy the artifacts in SOA File/DB based MDS.
Approach 1: Ant based script which allows to deploy the
artifacts into SOA MDS. I am not going to get to the details of this as this
has been blogged in detail by Edwin Biemond.
Note: The same process is applicable
for 12c too.
Approach 2: For a simple Manual Process SOA MDS deployment
follow the steps below.
- Open EM console. And click on soa-infra (soa_server (In my
case Admin Server)) under SOA on left pane of EM console.
- Click on Administration---> MDS Configuration
- In the Import
section choose the ZIP file which is having your MDS files.
- It will import
the MDS to server.
- Click on Close
button. This will complete our SOA-MDS Deployment.
DB Based MDS:
Database-based repositories are used in production
environments where robustness is needed. These repositories are created using
the Repository Creation Utility (RCU) application from Oracle. This utility
helps with the creation of a new database schema with its corresponding tables
and objects. Repositories can later be registered or deregistered via the
Oracle Enterprise Manager Fusion Middleware Control console.
Let’s see how to create DB based MDS
connection. In Create SOA_MDS Connection window, select DB Based MDS as
Connection Type for file based MDS connection.
For DB Based MDS connection,
we should have created the entire schema for the weblogic in the database by
running the Repository Creation Utility (RCU) wizard. After RCU execution, the
DEV_MDS schema will get created in the database. We need to use the DEV_MDS
schema connection and soa-infra as MDS Partition while creating
the DB Based MDS connection as shown in the below screen shot.
Click OK. Now the DB
Based MDS connection is created.
adf-config.xml configuration:
Modify adf-config.xml
with desired information.
adf-config.xml:


